
Seti I Beneath the Persea Tree
- Natalie Watson

- Sep 15, 2022
- 9 min read
Updated: Feb 17, 2024


Reproduction Details
Object: Painted bas-relief
Date: c. 1290-1279 BC
Period: Dynasty 19, New Kingdom
Dimensions: 375 x 260 cm
Findspot: Temple of Seti I, Abydos (upper scene of the west wall of the Second Hypostyle Hall between the Chapels of Re-Horakhty and Ptah)
Reproduction Note: This reproduction was made with reference to photographs of the current site by Heidi Kontkanen (Figure 3), Amice Calverley’s bas-relief reproduction in ‘The Temple of King Sethos I at Abydos’ (Figure 2), and Nina de Garis Davies’ colour reproduction in Ancient Egyptian Paintings Vol III (Figure 7).
Print Reference: DP76A
Seti’s Great Temple of Abydos
Seti I was the second pharaoh of Dynasty 19, ruling c. 1290-1279 BC, and the father of Ramesses II. His birthname Sety Merenptah meaning ‘Man of Seth, beloved of Ptah’ indicated he was consecrated to the god Seth, but upon ascending to the throne he took the prenomen Menmaatre, meaning ‘Established is the Justice of Re’.
Among the many achievements of the popular king’s reign, his temple at Abydos, the ancient cult centre of Osiris and burial place of the first kings, represents a high point in craftsmanship and ambition. Also known as the Great Temple of Abydos or the Memnonium, the temple was commissioned by the king to provide a place to honour the gods and his eternal soul. Unlike most temples, it was dedicated to more than one god. As well as the deified form of Seti I, it also included chapels honouring Ptah, Re-Horakhty, Amun-Re, Osiris, Isis, and Horus (Figure 1).

Figure 1 – Plan of the Temple of Seti I with the location of my reproduced scene marked in red (From ‘The Temple of King Sethos I at Abydos’ Vol. 1, Fig. 1)
The temple has an unusual L-shaped ground plan with a terrace, pylons, courts, hypostyle halls, chapels, and multiple storage chambers (Figure 1). It was first described by Flinders Petrie in 1901 and subsequently documented in 1933 in a richly illustrated four-volume series featuring exquisite reproductions by Amice Calverley (Figure 2). Only a few years later, Nina de Garis Davies published her own colourised version of the scene which remains the most useful reference version today (Figure 7).
The temple was unfinished at the time of the pharaoh’s death and completed by his son and heir, Ramesses II. It is famous for the beauty and quality of its decoration, and the presence of the invaluable ‘Abydos King List’. This relief records the names of 76 rulers from the previous 1,600 years (but omits the ‘illegitimate’ rulers from the Amarna period at the end of Dynasty 18).
You can explore a 3D model of the Kings List and models of some of the chapels in the temple made by David Anderson to help you visualise the space.
The Second Hypostyle Hall
My reproduction shows the upper scene of the west wall of the Second Hypostyle Hall between the cult chapels of Re-Horakhty and Ptah. The hall contains 36 sandstone papyrus columns with bud capitals and is decorated with scenes of Seti I kneeling before the gods. Seven barrel-roofed chapels dedicated to seven gods are accessed from the hall, and each is richly decorated in bas-relief. They show scenes of the king making offerings to each chapel’s resident god and receiving symbols of life, dominion, and royal power in return.

Figure 2 – Reproduction by Amice Calverley of the same scene (From ‘The Temple of King Sethos I at Abydos’ Vol. IV, Pl. 25)
At the time of Seti’s death, the carving and colouring of the bas-relief in the second hypostyle had not been completed, so only those on the west wall had the final layers of paint applied. When work was abandoned, the sculptors had completed the first stage of cutting the bas-relief and were in the process of engraving the finer detailing where it had been laid out in paint, or colouring the final reliefs. Seti's successors respected the reliefs in the second hypostyle hall, but none finished painting them.
My reproduction features one of the few scenes which received its final stage of decoration, and though faded, the colours used are a familiar palette of colours based on naturally occurring materials mixed to create a variety of shades:
Chalk, gypsum carbonates and sulphates of lime were used to create white.
Carbon in the form of soot was used to create black, which was mixed with white to create shades of grey.
Earth ochres were used for red, yellow and brown.
Orpiment, an arsenic sulfide mineral found in volcanic fumaroles, was used on rare occasions to create yellow and orange.
Artificial compounds of powdered copper, malachite or azurite were used to create blue (Egyptian blue) and green (green frit).
Symbolism
In this scene, Seti kneels in the shade of a Persea tree between the gods Ptah and Re-Horakhty, who are depicted seated upon thrones and offering the king divine symbols of protection. It is a harmonising scene, using the central figure of Seti and the tree to connect the two gods’ chapels. As Nina de Garis Davies commented, “…the beautiful design does honour not only to the pharaoh who built the temples, but also to the two gods outside whose adjoining chapels the scene is found.”
The quality of the bas-relief in this scene is some of the finest in Egyptian art and provides the figures with a wonderful lifelike 3D quality. Amice Calverley remarked that “…the figures show a sharper curve where the bone structure is near the surface, as in head, nose, shoulder and shin, whereas the softer texture of flesh is graduated almost to the background, each anatomical detail indicated with meticulous care within the limits of prescribed convention.”

Figure 3 – Photograph of the bas-relief as it looks today © Heidi Kontkanen
The Persea Tree
Also known as the Ished Tree or the Tree of Life, the sacred Persea Tree of Heliopolis was a potent symbol associated with the rising sun and linked to the concept of eternal life. The fruit of the tree was thought to provide knowledge of the cycles of time, and the king's titles are often shown being inscribed on its leaves by the gods (Figure 4).

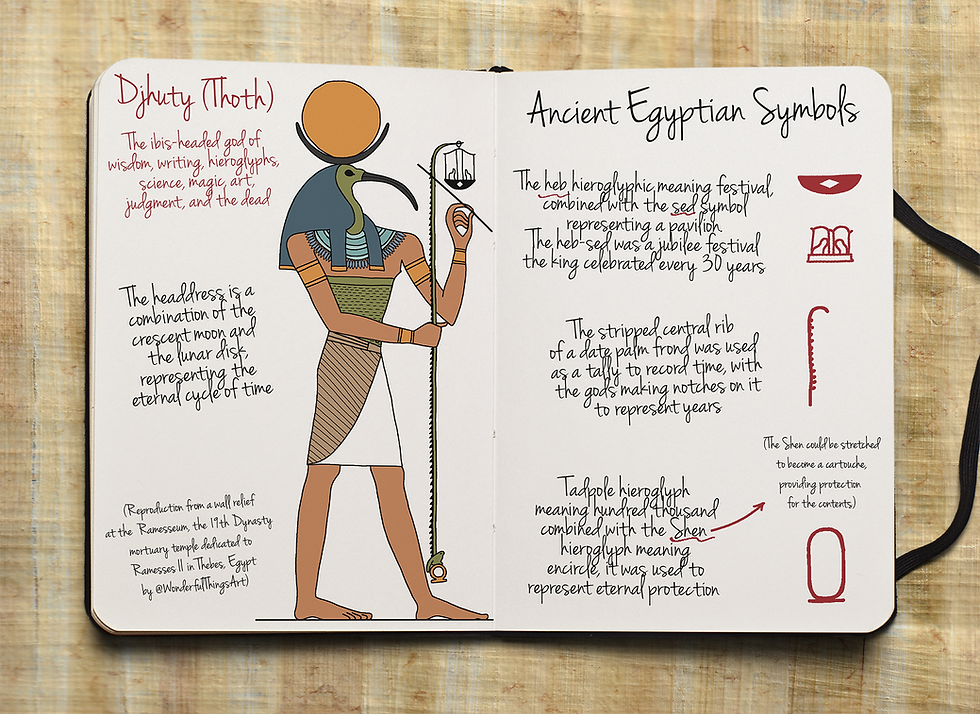
Figure 4 – My reproduction of a partially destroyed wall relief from the Ramesseum, the mortuary temple dedicated to Seti’s son Ramesses II in Thebes. The scene depicts the deities Atum, Seshat and Thoth inscribing the name of Ramesses into the fruit of the Persea tree, guaranteeing Ramesses an everlasting reign and innumerable jubilees.
In this scene, Seti kneels before the gods in front of the tree, whose branches sweep upwards following the line of the king's figure, forming a crown above his head. Ptah and Re-Horakhty are writing Seti’s name upon the leaves of the tree using brushes made from the rush called Juncus maritimus, used by scribes for painting outlines. These are often seen in art attached to the long scribal palettes holding paint, such as the one held by Re-Horakhty.
In mythology, the tree was said to be guarded by Mau, the Great Cat of the sun god Re, who protected it from his enemy Apep (Apophis), the serpent of chaos (Figure 5). In Chapter 17 of the Book of the Dead, Re in the form of Mau is described as:
“…the Cat which fought near the Persea Tree in Anu [Heliopolis] on the night when the foes of Neb-er-tcher [a primordial god of Creation] were destroyed…”

Figure 5 - Mau, "The Great Cat of Heliopolis" killing the enemy of the sun, Apep, before the Persea Tree (from the Tomb of Inherkau in Deir el-Medina (TT359) © kairoinfo4u)
The Persea tree appears throughout history in religious texts and literature, notably in the Tale of the Two Brothers, where the tree has the power to reanimate a dead man, and whose splinters impregnate his devious wife. In art, the tree features in illustrated copies of the Book of the Dead and temple reliefs, including those at the Ramesseum in Thebes (Figure 4) and the First Hypostyle Hall in the Temple of Karnak.
Pharoah Seti
Seti is shown bare-footed and bare-chested, with an elaborate pleated loincloth and belt, and wearing the blue crown upon his head. Around his neck is a broad wasekh collar, and on his wrists are jewelled bracelets. The king is shown kneeling on the hieroglyph for an alabaster basin that represents ‘festivals’ in hieroglyphic writing. During the carving stage, the sculptor mistakenly gave the basin the pattern of a woven basket (the hieroglyph neb, meaning ‘lord’), which the artists tried to correct during the later painting stage.

Figure 6 - A detailed view of the jewel Seti is offering to Ptah
Seti is offering Ptah a cunningly wrought inlaid jewel that is packed with symbolism indicating its purpose of granting unending jubilees to the king (Figure 6). The jewel shows the god Heh, who represented the concept of 'millions' or 'infinite time', squatting upon the same festival basin as Seti. In his hands, he holds two notched palm branches signifying the hieroglyph ‘renpet’ meaning 'years'. The palm branches end with a tadpole sitting upon a shen ring, which had the meaning of ‘hundred thousand’. Above the god Heh is the name of Menmaatre (Seti I), which is protected by two royal cobras (uraeus) with shen rings looped around their tails. One rears up next to a flowering rush representing Upper Egypt, whilst the other is flanked by a papyrus reed representing Lower Egypt.
The God Ptah

Figure 7 – Nina de Garis Davies colour reproduction of the same scene (from Ancient Egyptian Paintings, Vol. II, Pl. 86)
On the left of the king is the god Ptah, or ‘He-of-the-beautiful-face’. He sits on an elaborate throne within a golden shrine, which itself rests upon a plinth in the shape of the hieroglyph for Maat. This symbol of stability and truth is decorated with the ankh and was-sceptre, representing life and power. He dips his reed pen into the paint in the shell he holds and appears to be about to write his approval of Seti’s desire for unending jubilees embodied in the jewel in his hand. Ptah’s approval of Seti is reinforced by the pectoral suspended from his neck, which picks out his throne name Menmaatre in hieroglyphs and is flanked by the goddess Maat and two cobras representing Upper and Lower Egypt. He wears jewelled bracelets and a broad collar with a distinctive menkhet counterpoise over his right shoulder.
Ptah, the chief deity of Memphis, is one of the oldest Egyptian gods, first mentioned in Dynasty 1. He was considered to be a creator god and was particularly associated with craftsmen and funerary traditions. Ptah had several distinctive artistic attributes rarely seen in other gods, including a straight beard instead of a curved one, a tight-fitting skullcap instead of a headdress, and a counterpoise necklace with a rounded top and flared bottom. He is often depicted with elements that link him to the god Osiris, with a white shroud and green skin, which represent both the pallor of death and the fertility of new growth.
When Nina de Garis Davies created her colour reproduction of the scene (Figure 7), she noted that the “only details depending on paint alone, without relief, are the decorated matting behind Ptah, the coloured bands of the pillars of his shrine, and the markings of the cobras on the roof.”
The God Re-Horakhty
To the right of Seti is the falcon-headed god Re-Horakhty, who like Ptah, sits on a throne that rests upon the Maat hieroglyph. He dips his reed pen into the paint in the scribal palette in his hand and is already writing his assent upon the leaves of the tree, as numerous as the festivals to which Seti aspires. Upon his head sits a red solar disk encircled by a protective royal cobra.
In the earliest days of Egypt’s history, the sun god Re was merged with the falcon god to become Re-Horahkty or ‘Horus of the two horizons’. He represented the sun as it travelled across the sky (while Khepri and Atum represented the rising and setting suns respectively). As a form of the principal deity Re, he was worshipped throughout Egypt but was particularly associated with Heliopolis. He was considered to be the patron of the Pharaoh and the elite classes and a potent symbol of royal power.
A note on the missing hieroglyphs…
In the original scene, the hieroglyphs above Ptah describe him as ‘Lord of truth, and father of the gods in the House of Menmaatre’ (Figure 8). A similar dedication would have appeared to the left of Re-Horakhty, but these have unfortunately been lost and the space they occupied filled with structural concrete. Due to the incomplete nature of Re-Horakhty’s hieroglyphs, I took the decision not to reproduce them in my copy to maintain the balance of the composition.

Figure 8 – Detail of the hieroglyphs describing Ptah (From ‘The Temple of King Sethos I at Abydos’ Vol. IV, Pl. 25)
Summary
As with most pieces of royal propaganda, this scene is all about demonstrating the king’s legitimacy through divine approval. The jewel Seti offers Ptah represents his desire to rule Upper and Lower Egypt for millions of years, and the gods are granting their approval of this by writing his name into the myriad leaves of the Persea tree. This echoes many other scenes throughout the Great Temple of Abydos, in which Seti is depicted receiving symbols of power and everlasting life from a wide variety of gods.
Further Reading
Ancient Egyptian Paintings, Vol. I (1936), Vol. II, Plate 86 (1936), and Vol. III, p.164-65 (1936) by Nina de Garis Davies and edited by Alan Gardiner
Sethy I, King of Egypt (2019) by Aidan Dodson
The Complete Temples of Ancient Egypt (2000) by Richard H. Wilkinson
The Monuments of Seti I: Epigraphic, Historical, and Art Historical Analysis, p.171 (1998) by Peter J Brand
The Temple of King Sethos I at Abydos, Vol. I-IV (1933) by Amice Calverley and edited by Alan Gardiner


Comments